Print production demands precision. A single oversight in file preparation can result in wasted materials, missed deadlines, and costly reprints. The shift from screen to substrate exposes every technical shortcoming in your source files, and professional print environments operate with razor-thin margins for error.
Understanding the most common file preparation mistakes gives you the foundation to build reliable production workflows. These issues span color management, resolution standards, typography handling, and proper document setup. Each one follows predictable patterns, and each has concrete solutions within your existing software tools.
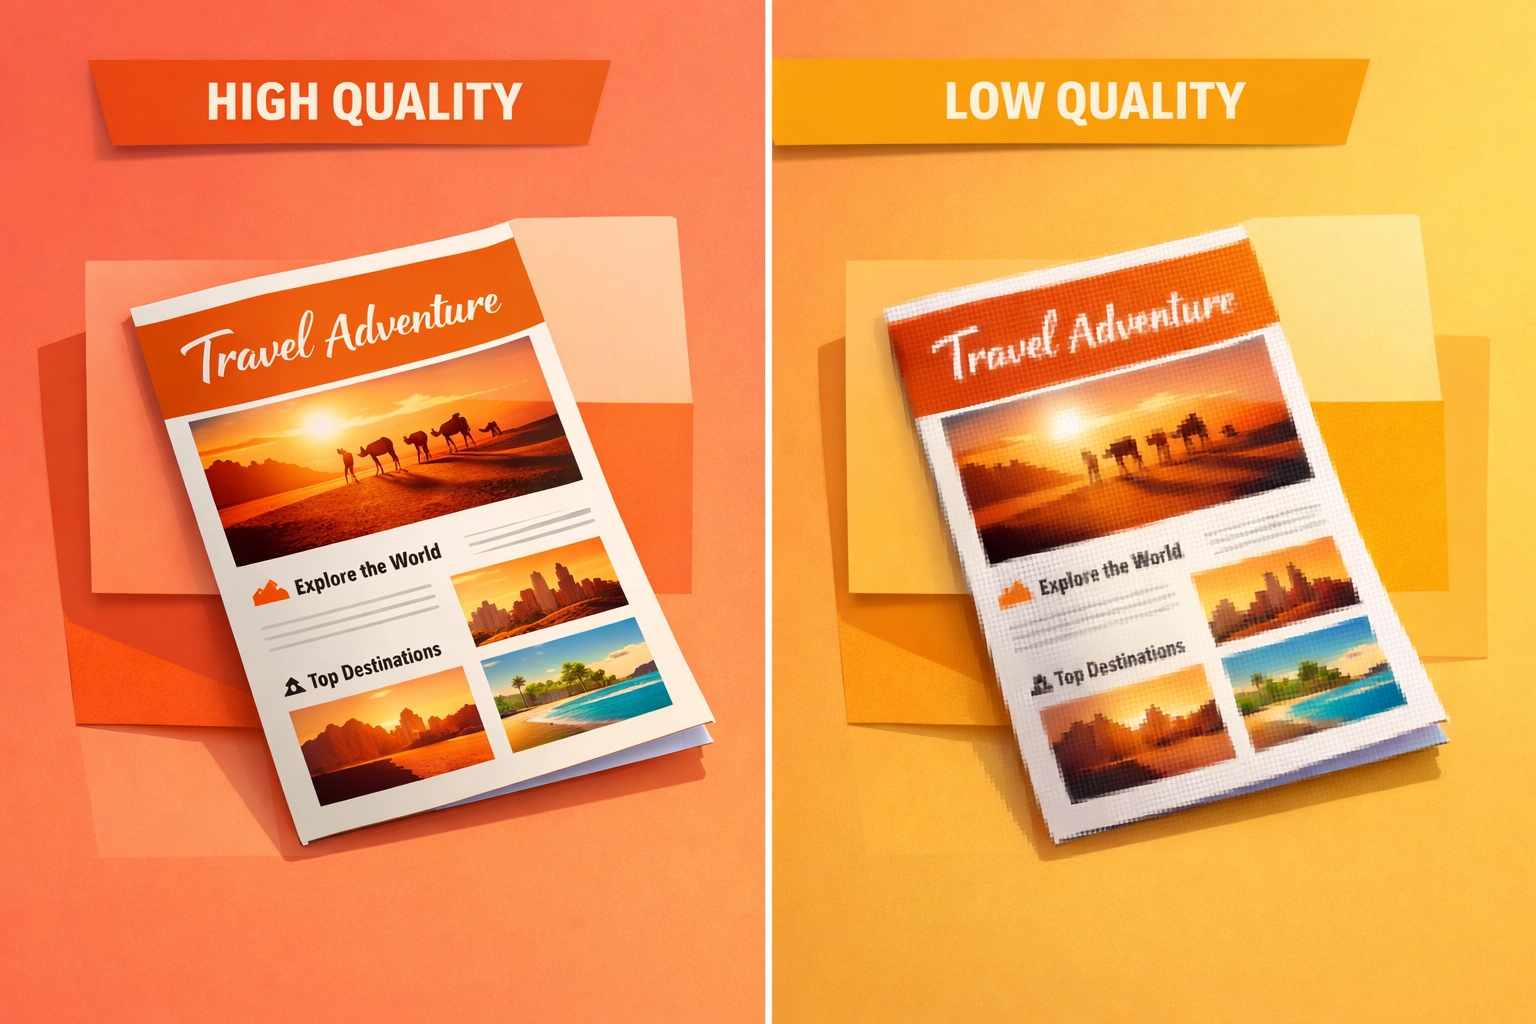
1. Using Low-Resolution Images
Screen displays operate at 72 to 96 pixels per inch. Print production requires 300 DPI at final output size. This represents more than a threefold increase in information density, and upscaling low-resolution images through software interpolation produces visibly degraded results.
Images sourced from websites, social media platforms, or mobile devices rarely meet print specifications. The same photograph that appears sharp on a monitor will exhibit pixelation and blur when output through commercial printing equipment. This becomes especially problematic in large-format work where viewing distances don't compensate for resolution deficiencies.
The Technical Fix: Configure your document resolution to 300 DPI before beginning design work. In Adobe Photoshop, verify this setting under Image > Image Size, ensuring "Resample" is disabled when checking existing files to see their true resolution. InDesign users should check the Effective PPI reading in the Links panel, which accounts for scaling applied within the layout. Any image showing below 300 PPI effective resolution needs replacement or rescaling.
Stock photography services and professional image libraries provide search filters for resolution requirements. When working with client-supplied imagery, establish minimum resolution standards in your intake process. Building resolution checks into your preflight workflow catches problems before files reach production.
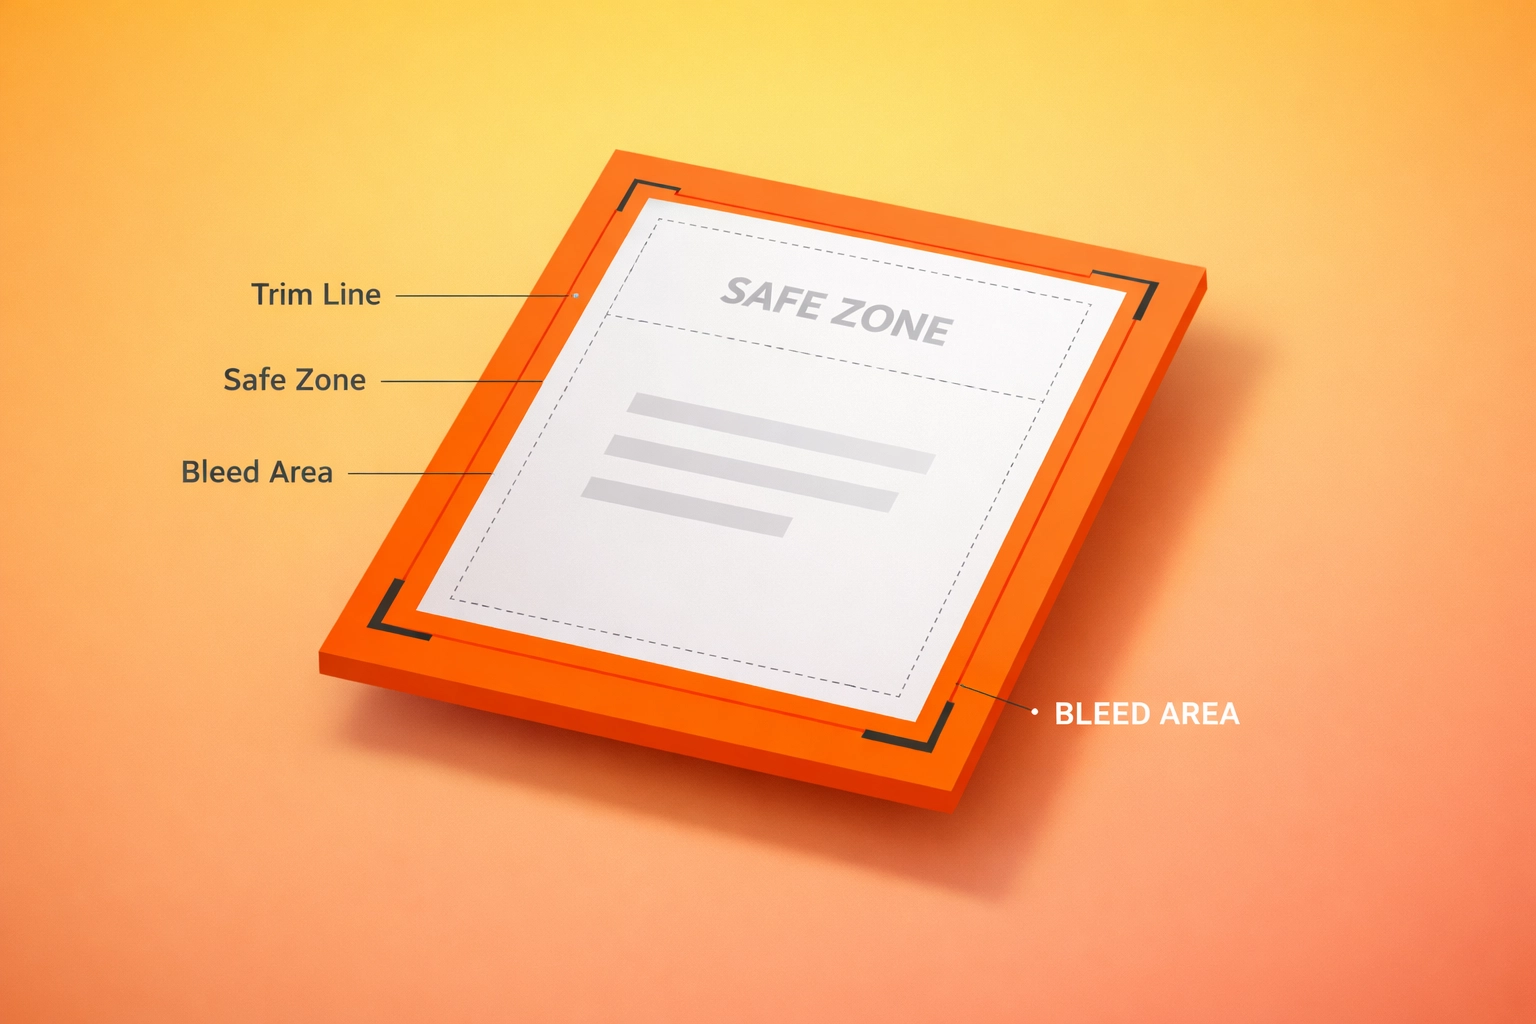
2. Failing to Account for Bleed
Commercial printing equipment cuts printed sheets using guillotine cutters with mechanical tolerances measured in fractions of millimeters. Without bleed extension, this cutting variance produces thin white slivers along trim edges. Folded products compound this issue, as fold lines require their own bleed considerations.
Standard bleed specifications call for 0.125 inches (3.175 mm) of extension beyond the final trim size on all sides that bleed to the edge. This provides adequate clearance for cutting variance while maintaining design integrity. Background elements, images, and any content intended to reach the edge must extend into this bleed zone.
The Technical Fix: Set bleed values during document creation. In Adobe InDesign, access these settings through File > Document Setup > Bleed and Slug. Enter 0.125" for all four bleed fields. Illustrator users find this under File > Document Setup > Edit Artboards, clicking the disclosure triangle next to Bleed.
When exporting to PDF, activate marks and bleeds. The Adobe PDF export dialog includes a "Marks and Bleeds" section where you select "Use Document Bleed Settings" and optionally enable crop marks. These marks show printers exactly where to trim, aligning with your established bleed zone. Affinity Publisher users access similar controls through the "More" button in the PDF export dialog.
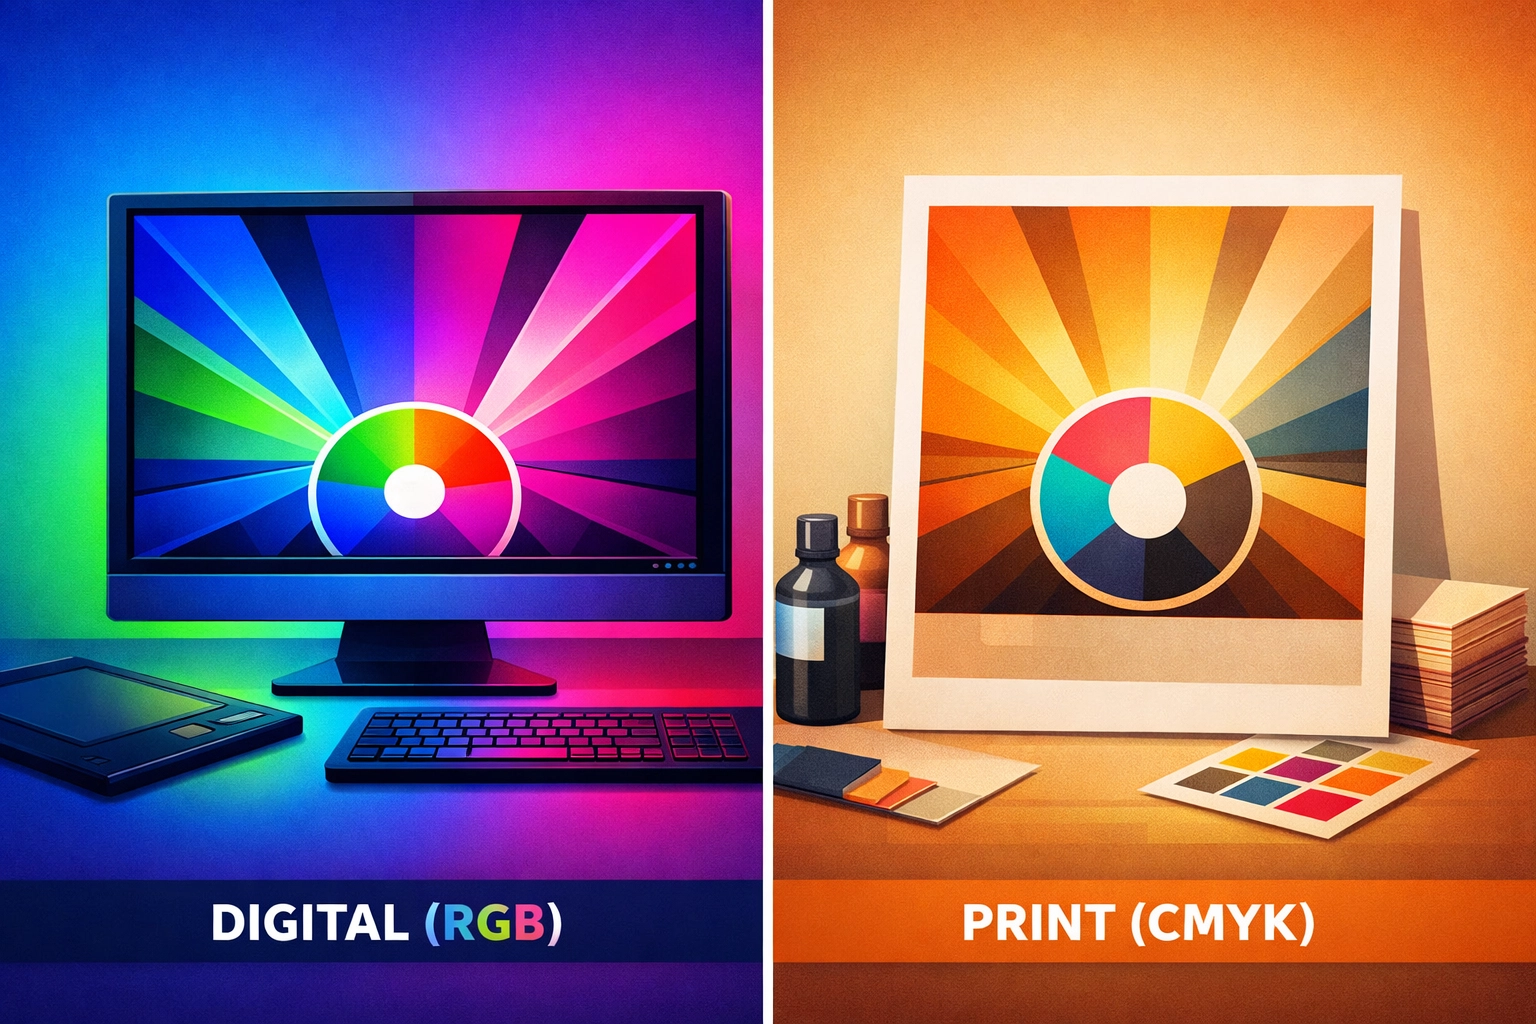
3. Designing in RGB Instead of CMYK
Digital displays generate color through additive RGB mixing, combining red, green, and blue light. Print production uses subtractive CMYK mixing, layering cyan, magenta, yellow, and black inks. The two color spaces have different gamuts, meaning certain bright RGB colors have no direct CMYK equivalent.
Vibrant blues, electric greens, and saturated oranges common in RGB often shift noticeably when converted to CMYK. Automated conversion algorithms make reasonable approximations, but the results frequently disappoint clients expecting screen-accurate color reproduction. This gamut mismatch causes more project conflicts than any other single technical issue.
The Technical Fix: Switch your color mode to CMYK before starting design work. In Photoshop, select Image > Mode > CMYK Color. InDesign defaults to allowing both RGB and CMYK objects; set your color intent under Edit > Color Settings, selecting a CMYK working space appropriate for your print vendor's specifications. Coated GRACoL 2006 or FOGRA39 serve as reliable general-purpose profiles for coated stock.
Adobe applications include a "Proof Colors" feature (View > Proof Setup > Working CMYK) that simulates CMYK output while working. This soft proofing shows color shifts before output, allowing design adjustments while maintaining visual accuracy. When importing images, convert them to CMYK in Photoshop before placement rather than relying on in-RIP conversion.
4. Not Embedding or Outlining Fonts
Typography relies on font files that define character shapes and spacing. Design applications reference these files dynamically, but print workflows require complete font information within exported documents. Missing font data forces printers to substitute alternative typefaces, fundamentally altering layout and visual hierarchy.
Font licensing restrictions sometimes prevent embedding, particularly with some free or low-cost typefaces. PDF specifications support font subsetting, which embeds only the specific characters used in your document while respecting licensing terms. Full embedding provides maximum compatibility but increases file size proportionally.
The Technical Fix: Adobe PDF export dialogs include font embedding controls under the "Fonts" section. Set the threshold to embed all fonts (0% subset threshold). This ensures complete font information regardless of usage percentage. InDesign's preflight panel (Window > Output > Preflight) flags missing or incomplete font embedding before export.
For maximum compatibility with older RIP systems, convert text to outlines. This converts typography to vector paths, eliminating font dependencies entirely. In Illustrator, select text objects and choose Type > Create Outlines. Be aware this makes text non-editable, so maintain layered source files with live text for future revisions. The outline approach works well for logos and simple text elements but becomes impractical for body copy due to file size implications.
5. Neglecting Spelling and Grammar Errors
Text errors in printed materials carry significant cost implications. Unlike digital content, printed pieces cannot be edited post-production. Spelling mistakes discovered during printing require stopping the press, creating new plates, and reprinting the entire run. The financial impact scales with quantity and complexity.
Automated spellcheckers catch obvious errors but miss context-dependent mistakes. Homophone confusion (their/there/they're), proper names, and technical terminology frequently escape automated detection. Client approval processes sometimes skip proofreading stages, assuming technical staff verify content accuracy.
The Technical Fix: Implement multi-stage proofreading within your production workflow. InDesign includes integrated spellchecking (Edit > Spelling > Check Spelling) that flags questionable words. Configure custom dictionaries to include industry terms, brand names, and technical vocabulary specific to your work.
Export a test PDF and review content outside the design environment. Reading text in a different context reveals errors invisible during layout work. Consider using grammar checking tools like Grammarly's desktop application, which can review PDF content and identify subtle grammatical issues. For high-stakes projects, invest in professional proofreading services before committing to production.
6. Sending Non-Print-Ready File Formats
Office software creates documents optimized for screen viewing and interactive use, not commercial printing. PowerPoint, Word, and Excel files lack proper bleed handling, color management, and resolution controls. Their export routines prioritize file size and compatibility over print quality, resulting in compromised output.
Native application files also require specific software versions to open correctly. A file created in Illustrator CC 2024 may not open properly in CS6, and definitely won't open in competing applications. PDF serves as the universal print exchange format, rendering content consistently across platforms while preserving print-critical specifications.
The Technical Fix: Export print-ready PDFs using PDF/X standards. PDF/X-1a and PDF/X-4 specifications enforce print production requirements, including CMYK color, embedded fonts, and proper bleed settings. InDesign and Illustrator include PDF/X export presets under the "Standard" dropdown in the PDF export dialog.
When working in non-professional applications, import content into proper design software before finalizing. Copy PowerPoint graphics into Illustrator. Import Excel charts into InDesign as linked objects. This workflow adds production steps but ensures proper color management and resolution handling. Always confirm your print vendor's preferred submission format; while PDF dominates multi-page work, some specialty printing processes prefer native application files with supplied fonts and linked images.
7. Ignoring Safety Margins and Trim Lines
Mechanical cutting systems operate with specified tolerances, typically plus or minus 1/16 inch. Critical design elements placed too close to trim areas risk being cut during finishing. The safe zone defines the interior area where important content should reside, typically 0.125 inches inside the trim line.
Large-format and specialty printing introduce additional considerations. Folding operations require clearance around fold lines to prevent cracking. Die-cutting adds complexity with custom shapes requiring precise registration between printed image and cutting forme. Each finishing operation brings its own margin requirements that compound with standard safety zones.
The Technical Fix: Establish safety margins during initial document setup. Most design applications allow custom margin guides separate from trim boundaries. In InDesign, create guides at 0.125 inches from the trim edge using Layout > Create Guides. Set these as document defaults for consistency across multi-page projects.
Keep body text, logos, contact information, and other critical elements well within safety margins. Decorative elements and background images should extend into the bleed zone, while functional content respects interior boundaries. Before finalizing files, review your exported PDF in Adobe Acrobat Pro at high magnification. Scroll through every page checking image sharpness, text clarity, and proper positioning of all elements relative to crop marks and bleed boundaries.
Preflight Before Production
Integrate automated preflight checking into your final export routine. Adobe InDesign's preflight panel continuously monitors documents against customizable profiles. Configure profiles matching your printer's specifications, including resolution thresholds, color space requirements, and bleed settings. Acrobat Pro DC includes similar tools under Tools > Print Production > Preflight, with dozens of print-specific checks available.
Most commercial printers provide preflight profiles specific to their equipment and processes. Import these profiles into your workflow software to catch issues before file submission. This front-loads quality control, preventing expensive problems from reaching production stages where corrections carry maximum cost.
Works Cited
"Avoiding Common Mistakes in Print Design." Print Magazine, 2024.
"File Preparation Best Practices for Commercial Printing." Printing Industries of America, 2025.
Johnson, M. "Color Management in Digital Print Production." Journal of Graphic Technology, vol. 42, no. 3, 2024, pp. 127-145.
"PDF/X Standards for Print Production." Adobe Systems, 2025, www.adobe.com/print/pdf-x-standards.
Thompson, R. "Resolution Requirements for Print vs. Digital Media." Graphics Pro Magazine, 2024.
"Understanding Bleed, Crop Marks, and Safety Margins." GRACoL Technical Reference, Idealliance, 2025.
Recent Comments